26 May 2013

m's brownie biscuits


Every girl needs a failsafe chocolate cake recipe. I have two favourites: a dense loaf cake from Nigella Lawson, and the ‘ultimate’ brownie from, of all places, a fashion magazine. Oh, I’ve tried other recipes, but the flavour is either missing or bitter. For me, fabulous fudginess is guaranteed only by Nigella or Glamour.
 
Until now.

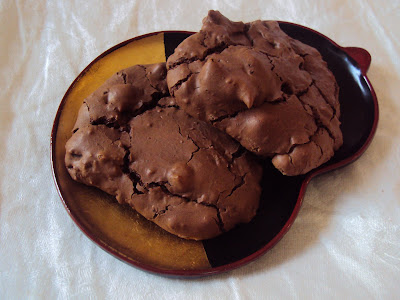
Now I have another chocolate favourite, thanks to my friend M. And my goodness, is it fabulous and fudgy. And – fast. Why, how? Because it is a brownie disguised as a biscuit. Yes, you read that right. It has the shiny, crackled top and the decadent squidgy texture within of a good brownie, but whereas a brownie takes around 45 minutes to bake, these little beauties take only 15. That’s right, only 15 minutes before you’re on a chocolate buzz, thinking (all at once): why didn’t I double the recipe? The diet starts tomorrow; I need a tall glass of cold milk; will I have any left to take to work? The kitchen still smells like chocolate!

Or, of course, your brain could be just blank – blissed out on brownie biscuits (note the plural).

Thank you, M!

Brownie biscuits
Adapted from an Observer recipe emailed by M. I halved the original recipe (now I wish I hadn’t!) because I blanched at the thought of using almost half a kilo of chocolate in one recipe. Though as M wisely said, ‘Just ignore the amount of chocolate and focus on how they taste; that’s how I approach these cookies’. Oh, and I think these are best warm, so do zap them in the microwave for a few seconds to get that chocolate all fudgy again. Made ten.
  • Preheat your oven to 170 and prep a baking tray.
  • A little further prep: chop 100 gms dark cooking chocolate into chunks and set aside for later.
  • Put 25 gms butter and another 100 gms dark cooking chocolate in a heatproof bowl over a saucepan of simmering water and melt gently, stirring until smooth. Remove from heat.
  • Whisk together 1 egg, 85 gms light brown sugar and ¼ tspn vanilla until combined.
  • Pour in the melted chocolate mix and whisk again to combine (a free standing beater comes in handy here).
  • Fold thru about 40 gms plain flour, ¼ tspn salt and ¼ tspn baking powder, then add the chopped chocolate (be sure to lick the spoons and bowls for this one!).
  • Drop spoonfuls onto your baking tray then bake for 15 minutes; the tops will look shiny and will crack apart. They’ll still be soft when you remove them from the oven so leave to cool on the trays for a few minutes before transferring to a wire rack. Or into your mouth.

22 May 2013

roast pumpkin + beans


Sooner or later, all my conversations wind their way around to food. I do talk about other things – the weather also features high; live in Tassie and you understand the immediacy and importance of this topic. But depending on who I’m chatting to, there’s chickens, dogs, flowers, pink nail polish, exercise (or lack thereof) and … food.

B and I caught up over a café breakfast last weekend. She had baked eggs with bright green avocado chunks and pea shoots on top; I had the fanciest banana on toast ever, which I’ll try to copy at home: banana chunks on thick crusty toast with honey, walnut pieces, spices, natural yoghurt and those large ribbons of desiccated coconut. Fabulous!

So, as we looked out the window and watched the sun disappear and the grey descend over Hobart (and it was not even mid-morning!), we talked about what we were cooking to keep ourselves warm. B was going to make her own baked beans, and we discussed molasses versus golden syrup. Molasses being in the recipe, golden syrup being in her pantry.

Which got me thinking about a recipe that was not exactly baked beans, but rather roasted pumpkin and potato mooshed with beans in a tomato-y sauce. It was full of autumnal flavours: rosemary and garlic roasting in with the pumpkin; smoky paprika and chili (my go-to flavourings) in with the tomato.

And the beans? While the recipe specified tinned borlotti beans, I’m not sure if such a thing exists in Hobart, so I used tinned butter beans instead. Their large size was a good match to the chunks of caramelly pumpkin and roasted potato. Even better would have been scarlet runner beans, salvaged from those pods that hide and grow large and starchy. I must ask mum if she has any squirrelled away in a freezer bag.

Anyway, I decided this is a meal definitely worth talking about ... with you! So if we were sitting in a cosy café together, warming ourselves over sencha (me) and cappuccino (you), I’d enthuse over the ‘big’ texture of the roasted potatoes and pumpkin and chunky butter beans. I’d ask if you knew where one could find tinned borlotti beans in Hobart.

I’d tell you to use as much dried chili flakes and smoky paprika as you prefer; or maybe try some fresh chili? And instead of fresh rosemary, you could use another woody herb like sage or thyme; this recipe is very accommodating.

Oh, make sure you use good quality tinned tomatoes, maybe the ones you get from a gourmet grocer’s. Perhaps look for the ones with colourful labels, so you can recycle the tins as herb planters or utensil holders in your kitchen.

Finally I’d tell you this is a hearty but not heavy winter warmer meal, one that doesn’t take that much effort to make. A side of crusty toast and plenty of parsley makes it perfect.

Roast pumpkin and beans
Adapted from She cooks, she gardens. Please visit Erin’s delicious site! She served her pumpkin and beans on toast and with pan-fried haloumi slices on top, which would make this even more fabulous. Makes enough for two or three serves.
  • Preheat your oven to 180.
  • Take about 500 gms pumpkin (I used the Kent variety) and cut roughly into bite-sized chunks. I left the skin on mine and this wasn’t a problem, but you can peel it if you prefer. Take roughly an equal amount of potato and chunk that too.
  • Strip the leaves from a small spring of fresh rosemary. and finely chop.
  • Add your vegies and herbs to a large roasting tray, drizzle with some olive oil and add some S&P. Roast until soft and golden (mine took about 40 minutes).
  • Towards the end of the roasting time, take a medium saucepan, add a little olive oil and a crushed garlic clove of two and sauté gently. Add a good dash of smoky paprika and dried chili (to your taste).
  • Add a tin and a half (which is all I had – use two full tins if you have them!) of good quality tinned whole tomatoes. Bring to a simmer, breaking the tomatoes up with your spoon, but leaving it still thick and chunky.
  • Drain a tin of butter beans, add that to the tomato mix and heat thru.
  • When the vegies are done roasting and the tomato sauce is ready, add the vegies into the pot of sauce. Using a potato masher, give the lot a bit of a moosh – just enough to mash some of the beans and vegies, but not all. You want to retain some chunkiness (this dish is about texture as well as flavor!).
  • Serve with freshly chopped parsley and a squeeze of lemon juice.


19 May 2013

passionfruit coconut pudding


One of those days for you, too?

The light in your kitchen is dismal, you take one photo and you get a 'memory stick full!' message (must remove all those Floriade pics). So you plug in to download some of your photos and the camera battery goes kaput. Give up on technology, throw a tizz, eat some chocolate.

You haven't quite got the amount of passionfruit you need for this recipe, but how would you know that until you've cut open and scooped out the wrinkly little fellows?

Anyway, you're committed - the batter is ready; you haven't got enough butter or eggs to start another recipe. No backing out now.

I love a batter shot.

Passionfruit and coconut pudding
Adapted from a supermarket magazine. This has a lovely tropical flavor (and colour!), just right as we're heading into winter. The original recipe specified six 3/4 cup ramekins at 25 minutes. Oh, and it turned out I did have enough passionfruit pulp - it truly was one of those days.
  • Preheat your oven to 180 and butter a baking dish (about 4.5 cups capacity).
  • Cream 200 gms soft butter with 3/4 cups sugar and 1 tsp vanilla.
  • Add 3 eggs.
  • Add 1/2 cup passionfruit.
  • Fold thru 1 cup SR flour, 1/2 cup plain flour and 1/2 cup dessicated coconut.
  • Spoon into your baking dish, smooth the surface and sprinkle with a little raw sugar.
  • Bake for about 45 minutes or until done, covering with foil if browning too much.
  • Serve warm with ice cream or cream.


16 May 2013

quinoa + cauli fritters


I usually resist the supposed charms of inspirational quotes, but one I do have stuck to my screen at work reminds me that ‘it’s called yoga practice, not yoga perfect’. These words kick me to roll out my mat when I get home, not just at my weekly class (so perhaps I should have the quote taped to the TV screen or on the growing pile of magazines near the couch or on the fridge door). Because it’s also yoga practice, not yoga procrastination.
 
Because it’s doing something again and again, to feel and catch the rhythm of it and realise that each time you do ‘it’, it may be better – you may be better - or it may be just different.
 
It’s a lot like that in life, too, and a lot like that in the kitchen lately. Cooking and baking - the chopping, measuring, building flavours - is always a learning experience. Sometimes it’s routine and sometimes it’s a surprise.
 
I’ve been making a lot of old faithfuls for dinner lately – in particular the tuna pasta bake and the pasta dish I’ve nicknamed ‘mojo spaghetti’. Each time they are different – the bake, for example, has seen the tuna come and go, peas pop up, chilli flakes or lots of parsley enter the equation, but the lemon zest and garlic remain unquestionable foundations (as of course does the pasta).
 
I’ve found too that practice gives confidence and freedom. Just as standing with your feet about a metre apart, left foot turned in and right foot turned well out, left hand on your hip and right arm extended out as you bend and tip your balance to the right as if you’re a teapot, right hand touching the floor as you assume a kind of starfish-on-one-leg look – just as doing all those things at once and over and over again means you can perform half-moon pose without labouring or floundering thru the myriad instructions – well, so too it is with repeating a recipe until you barely glance at the page and you have multiple pots and pans dancing effortlessly in your kitchen, not a panic on the horizon. You do it - and enjoy it.
 
Cooking quinoa is one of those things I do pretty regularly. If we’re talking practice, cooking legumes and grains is one of those kitchen skills I need to do more often, because I’m not yet relaxed about it. Will the quinoa boil dry? Will it be gluggy? Stick to the pan? Turn to mush? Be fluffy?
 
Well yes it will be, I discovered, if I try a different approach. Instead of boiling it on the stovetop, I took a chance and put it in my rice cooker.
 
Maybe practice does make perfect – perfectly fluffy quinoa, anyway! To labour the yoga metaphor, just as having a crack at a new pose and thinking ‘woo hoo!’ (hello, pigeon!), so too it was for me with rice cooker-cooked quinoa. The world will never be the same again.
 
Quinoa and cauli fritters
Adapted from a Donna Hay recipe published in the Sunday papers. The recipe said to steam the cauli, but I thought that might make it soggy, so I roasted it. This also gave the cauli extra colour and flavour. It’s not as quick as steaming though, so do steam if you’re time-pressed. Also, at first I thought all this prep was a bit of a palaver, and I wouldn't bother with these again. But I've enjoyed them so much, I would! Maybe if I had some leftover quinoa and cooked vegies...This made 10 fritters for me.
 
Do ahead stuff
  • Cook 1 cup of quinoa with two cups of water — in your rice cooker if you have one, for perfectly fluffy quinoa, or on the stovetop as you would rice.
  • Preheat your oven to 180. Take about 250 gms cauliflower and chop into smallish pieces, lay on a baking tray, drizzle with oil, sprinkle with S&P and some fresh sage leaves. Pop into oven and roast until soft and cooked and a little browned. Remove from oven and chop into further small pieces.
The fritters
  • Into a bowl, add your cooked quinoa, roasted cauli, 250 gms ricotta (drained if necessary), ½ cup grated parmesan, as much chopped green herbs as you like (I used chives and parsley; the recipe specified dill). Whisk three eggs and add this to the bowl, with a little S&P, mashing thru until combined.
  • Because this next stage is incredibly mucky, do some prep work: clear space in your fridge, line some plates with paper towel or greaseproof paper, and have some paper towels on hand.
  • Using a 1/3 cup measuring cup, scoop out the mixture, then shape into patties. Place on your prepped plates, then refrigerate for at least half an hour.
  • When ready to cook, heat a little oil in a large frypan and cook the fritters, in batches, for about 4 minutes each side or until golden brown. Drain on paper towels and serve with further vegies or a salad, as you wish.

12 May 2013

brown sugar plain cake

Spotty cloth from Frangipani Fabrics.
 
Every now and then I need a plain cake. A plain cake is a very good thing: a palate cleanser after rich chocolate cake or panettone pudding, for example. A good plain cake is never boring: buttery and simple, it can be enjoyed with a cup of green tea for a quiet moment at the end of a long day, or served up with fruit — zingy stewed rhubarb, soft summer berries, spicy roasted plums — and a good blob of thickened cream.

My go-to plain cake is a Women’s Weekly one made with greek yoghurt; sometimes I make it as a batch of cupcakes and freeze them immediately so I have a ready stash for when I’m craving simplicity.

I’d been itching to make a plain cake anyway and was about to add greek yoghurt to my grocery list when I remembered Paula’s brown sugar version at Vintage Kitchen Notes. It delivered just what I was after, a calming cake with barely a trace of sweetness – while some may say that’s a flaw, a lack, I love this kind of subtlety every now and then. Making it in a loaf tin also reinforced the notion that you could easily cut off slice after slice – elegantly thin for that contemplative cup of tea; a more substantial chunk to support any accompanying fruit or ice cream, perhaps. It may be plain but it’s very versatile.
Brown sugar plain cake
Adapted from Vintage Kitchen Notes. Please visit Paula – her pictures are so much prettier than mine, and her temptations are many.
  • Preheat oven to 180 and prep a medium sized loaf tin.
  • Cream 75 gms soft butter with ½ cup light brown sugar and ¼ cup white sugar.
  • Add 2 eggs and ½ tspn vanilla (I used the paste, but there actually wasn’t enough to make the specks really noticeable).
  • Then sift and stir in 1 and ¾ cups plain flour, 2 tspns baking powder (this is less than Paula specified but worked for me) and a scant ¼ tspn of salt, then 2/3 cups of sour cream. My batter was quite stiff.
  • Spoon into the loaf tin and bake for 45 minutes or until done.

9 May 2013

of blow torches and brulee


My friend F (hola!) has loaned me her culinary blow torch, for making creme brulees, as well as these lovely traditional Spanish earthenware pots.

Besides creme brulee, what other culinary uses can I put the blow torch to?

I've never used one before - do you have any tips or techniques? You know, how not to set the kitchen bench alight...

And can you recommend a brilliant brulee recipe?

6 May 2013

marble cake

When I was a little girl, my favourite birthday cake was a marble cake. Cutting the cake to reveal the magical, random swirls of bright colour was a special moment, one that never failed to make me happy. And how could I not be happy? It was my birthday, there would have been candles and singing, and then this pretty, colourful, yummy cake - made just for me!

Mum must have made this for our birthdays regularly (and only on our birthdays) because to me, 'marble cake' is synonymous with 'birthday cake'. So much so that even now I'm a big girl, I like to have marble cake to celebrate another passing year (perhaps 'celebrate' is too optomistic a word now. I acknowledge my birthday).

A couple of years ago, mum found this poshed-up version of marble cake. Same pucci-esque pattterns that still delight me, but studded with grown-up extras: moist raspberries in the pink batter, gooey chocolate chunks in the brown, and almond slivers for a contrasting chew in the plain.

So happy birthday to me and to Dig In. My blog is now one year old! Me? Many more than that. Enjoy!

Marble cake
A Women's Weekly recipe, March 2006. Mum made this, and she pretty much followed the recipe (instead of tweaking wildly).
  • Preheat oven to 160 and prep a deep 20cm round tin.
  • Combine 125 gms soft butter, 1 tspn vanilla, 1 and 1/4 cups sugar, 3 eggs, 3/4 cups plain flour, 3/4 cups SR flour and 1/2 cup milk in a medium bowl. Using your electric whisk, beat slowly at first to combine ingredients, then increase speed to medium and beat for a couple of minutes until smooth and a paler colour.
  • Divide the mix between three bowls.
  • In the first bowl, add some pink food colouring then gently stir thru 50 gms frozen raspberries.
  • In the second bowl, sift in 1 tbspn cocoa and 50 gms dark chocolate that you've chopped into chunks.
  • In the third bowl, fold thru 25 gms slivered almonds.
  • Now drop heaped spoonfuls of each mixture into the pan. Once all in, tap cake tin gently on the bench to release any large air bubbles that might be trapped between your dollops.
  • Bake 1 hour and 10 minutes or until done. Happy birthday!

2 May 2013

on toast


I was about to write that toast is not something I think too deeply about, but I realised that while I might not think deeply I am fussy about my toast. But then, aren’t we all? For something so basic, don’t we all have rigid preferences?

For me, the bread must be substantial. If I’ve been to a fancy bakery on the weekend I may have a solid sourdough or a chewy ciabatti, cut as thick as will fit in the toaster slots. But usually I enjoy a pre-sliced loaf from the supermarket, dense with grains and pumpkin seeds that I love to nibble on once toasted. With all its tasty bits and pieces, each nubbly slice holds its ‘architecture’ under any topping – it doesn’t collapse into a thin shadow of itself.

There is nothing worse, in my book, than cold toast. As soon as it pops up it must be slathered with butter – well, a half canola–half butter spread thingy; margarine has never darkened my (fridge) door but butter is too hard to spread without tearing the toast (and I would never have the foresight to leave it out to soften; not that it would this morning when there was snow on the mountain). It requires quick work so the butter melts immediately and pleasingly — is there not a more comforting sight than the pale yellow stuff softening and disappearing into the toast’s surface?

Not according to my dad, who toasts his white bread then goes for his morning walk or potters in the greenhouse for a bit before coming back to butter a cold and dry slice. The butter just sits there. I will never get used to that, even though I have seen him do it for years.

The great issue then is what to put on the toast. How fancy do you go? I can be happy with the dairy spread, or a thin scrape of salty vegemite; I find vegemite especially comforting if you’re a bit under the weather or miserable — something about its robust saltiness bolsters the spirit. I have a strict regime of peanut butter and banana slices on toast as my pre-yoga energy boost; the protein and carb combo fuels me through a couple of hours of trikonasana and downward dog. And Sunday night suppers are eggs on toast; something of a family tradition (though actually, I can have egg on toast any night of the week). Oh, and let's not forget the summer joy of a thick slice of a juicy black krim tomato (homegrown, of course).
But there has to be sweet stuff with toast: honey (and maybe some banana) or homemade berry jam (and maybe a blob of natural yoghurt; I fear I am addicted to the stuff). Currently I have mum’s zingy lemon marmalade and lemon butter, as yellow as sunshine. I must admit though, the toast is merely to stop me from feeling guilty if I just ate the marmalade straight from the jar.

I have not even covered the degree of toastiness that is acceptable. Barely golden or darkly scorched? Where do you sit on the spectrum, and what are your (deep) thoughts on toast?